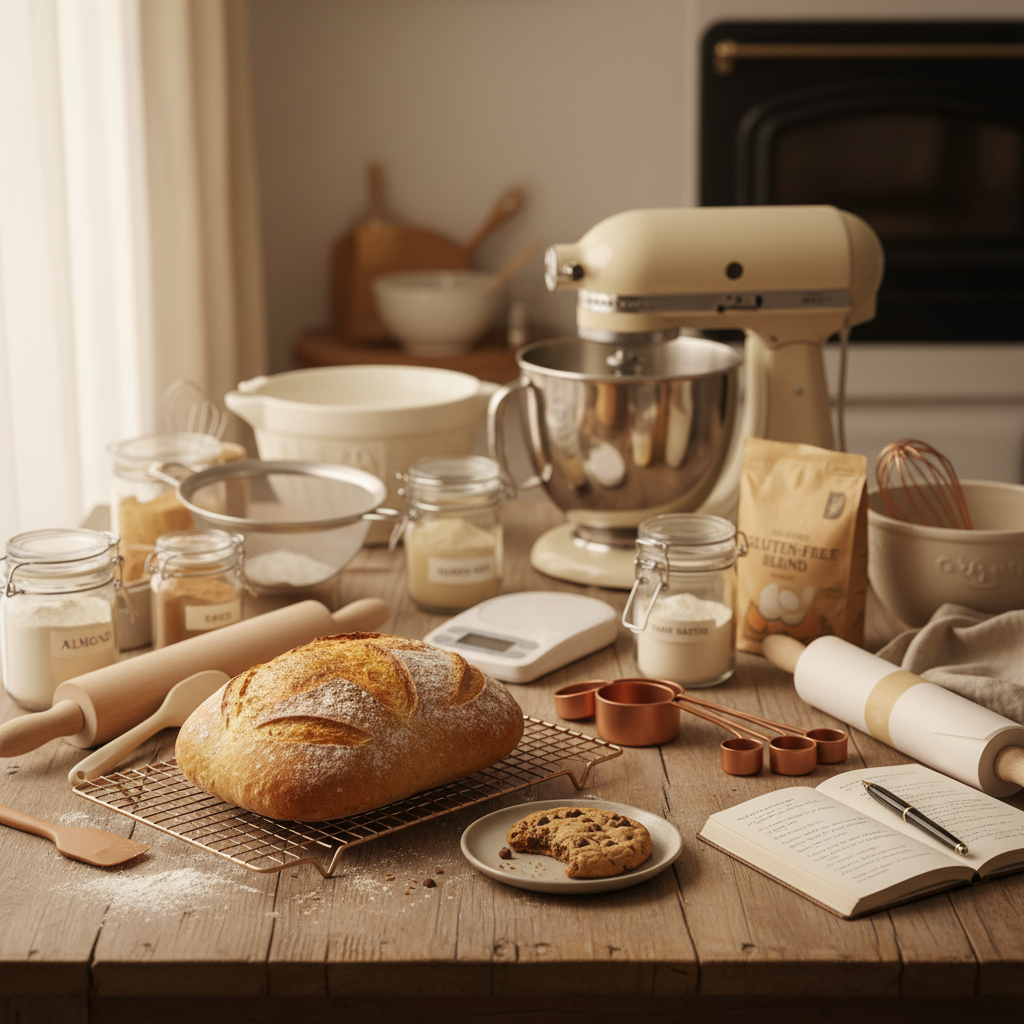
Gluten-free baking is more technique-sensitive than conventional baking, and having the right equipment makes a genuine difference in your results. Here's our complete essential gluten-free baking equipment list, organized by priority so you know exactly where to invest first.
Key takeaways
- A digital kitchen scale is the single most important piece of equipment for gluten-free baking — cup measurements are too inconsistent with gluten-free flours.
- An instant-read thermometer helps you avoid the most common gluten-free bread problem: gummy, underbaked centers.
- You don't need to replace everything at once — start with measuring tools and a good stand mixer, then build from there.
- Light-colored metal pans produce more even results with gluten-free batters than dark or glass pans.
- Dedicated gluten-free equipment matters if you're baking for someone with celiac disease — shared wooden spoons and silicone spatulas can harbor gluten.
- Many essential tools cost under $30 and will dramatically improve your baking consistency.
Why gluten-free baking needs different equipment
Gluten-free batters and doughs behave differently from wheat-based ones. They're often wetter, stickier, and more sensitive to temperature and measurement variations. That means the margin for error is smaller, and your equipment needs to compensate. A slight mismeasurement of coconut flour — which absorbs roughly four times the liquid of wheat flour — can wreck a recipe. The right tools help you nail consistency every single time.
If you're just getting started with gluten-free baking, our Confident Gluten-Free Baker Toolkit walks you through the fundamentals so you can pair the right techniques with the right equipment from day one.
Digital kitchen scale: the most important tool on this list
A digital kitchen scale is non-negotiable for consistent gluten-free baking. Gluten-free flours vary wildly in density — a cup of almond flour weighs about 96 grams, while a cup of brown rice flour weighs around 158 grams. Scooping versus spooning can create 20-30% measurement differences, and that's enough to turn a great recipe into a dense, gummy mess.
Look for a scale that measures in grams (not just ounces), has a tare function, and handles at least 11 pounds. We use the OXO Good Grips 11lb Food Scale and it's been rock solid for years. If you want a deeper dive on why weighing matters, check out our beginner's guide to measuring baking ingredients.
Instant-read thermometer for checking doneness
An instant-read thermometer solves the number one frustration in gluten-free bread and cake baking: cutting into something that looks perfect on the outside but is gummy or raw in the middle. Gluten-free breads should reach an internal temperature of 205-210°F (96-99°C), while cakes and muffins are done at 200-205°F.
The visual cues that work for wheat baking — golden color, pulling away from the sides — aren't as reliable with gluten-free recipes. If you've ever wondered why your gluten-free bread is gummy in the middle, an underbaked interior is almost always the culprit, and a thermometer eliminates the guesswork. The ThermoWorks Thermapen ONE is the gold standard, but any reliable instant-read thermometer will do the job.
Stand mixer with a paddle attachment
A stand mixer isn't strictly required, but it makes gluten-free baking dramatically easier. Gluten-free bread doughs are typically closer to thick batters than traditional doughs, and they need sustained, vigorous mixing to properly hydrate starches and activate binders like xanthan gum or psyllium husk. Trying to do this by hand is exhausting and inconsistent.
Use the paddle attachment (not the dough hook) for most gluten-free bread recipes. Since there's no gluten network to develop, the paddle does a better job of incorporating air and evenly distributing ingredients. The KitchenAid Artisan 5-Quart Stand Mixer is the workhorse most home bakers rely on.
Essential baking pans for gluten-free recipes
The type of pan you use affects how evenly your gluten-free baked goods cook, how easily they release, and whether they brown properly. Here's what we recommend having on hand:
Pan type | Best for | What to look for |
|---|---|---|
8.5 x 4.5-inch loaf pan | Sandwich bread, quick breads | Light-colored aluminized steel; avoid dark nonstick |
9-inch round cake pans (set of 2) | Layer cakes | Straight sides, at least 2 inches tall |
12-cup muffin tin | Muffins, cupcakes | Standard size; use paper liners for easy release |
Half sheet pans (set of 2) | Cookies, flatbreads, sheet cakes | Heavy-gauge aluminum; won't warp at high temps |
9 x 13-inch baking dish | Brownies, bars, casseroles | Metal preferred over glass for even heat |
9-inch pie plate | Pies, quiches | Glass or ceramic for a crisp bottom crust |
A quick note on pan color: light-colored metal pans reflect heat and produce more even browning. Dark pans absorb more heat and can over-brown the edges of gluten-free baked goods before the center is done. This is especially relevant if you're troubleshooting issues like gummy gluten-free brownies or dense bread.
Measuring cups and spoons (even if you have a scale)
Even with a kitchen scale as your primary measuring tool, you still need a good set of measuring cups and spoons for small quantities of leaveners, salt, and extracts. A half-teaspoon difference in baking powder can mean the difference between a beautifully risen cake and one that sinks in the middle.
Get stainless steel measuring spoons with clearly etched markings (printed labels wear off). For liquid measurements, a glass or clear plastic measuring cup with a pour spout works best. We also recommend having a set of odd-size spoons (1/8 teaspoon, 2/3 tablespoon) since gluten-free recipes often call for precise amounts of binders and starches.
Fine-mesh sieve for sifting flour blends
A fine-mesh sieve is essential for breaking up clumps in gluten-free flour blends and ensuring even distribution of starches, leaveners, and binders. Many gluten-free flours — especially coconut flour and tapioca starch — clump aggressively in storage. Sifting before mixing prevents pockets of dry flour in your finished bake and helps avoid that gritty texture that plagues many gluten-free recipes.
You don't need anything fancy. A basic stainless steel fine-mesh strainer in an 8-inch size handles most tasks. Just tap it gently over your mixing bowl.
Silicone spatulas and bench scrapers
Gluten-free batters tend to be thicker and stickier than wheat batters, which means more of your precious batter clings to bowls, beaters, and spoons. A flexible silicone spatula lets you scrape every last bit into the pan, and that actually matters — gluten-free ingredients are expensive.
A bench scraper is invaluable if you work with any gluten-free doughs on a surface, like pizza dough or biscuits. If you're dealing with sticky gluten-free dough, a bench scraper helps you handle it without adding too much extra flour.
Cross-contamination note: If you're baking for someone with celiac disease, consider having dedicated silicone spatulas and wooden spoons for gluten-free baking. Silicone is easier to fully clean than wood, but scratched or worn silicone can still trap particles. When in doubt, replace them.
Parchment paper and silicone baking mats
Gluten-free baked goods are notorious for sticking, even in greased pans. Parchment paper is your insurance policy. Line your loaf pans, sheet pans, and cake pans with parchment every time. For cookies, a Silpat silicone baking mat provides a consistent, reusable nonstick surface that also promotes even browning on the bottom.
Pre-cut parchment sheets sized for half sheet pans save time and frustration compared to wrestling with a roll.
Cooling racks
Proper cooling is critical for gluten-free baked goods. Gluten-free breads and cakes continue to set their structure as they cool, and trapping steam by leaving them in the pan too long leads to soggy bottoms and gummy texture. A wire cooling rack with a tight grid pattern (so muffins and small items don't fall through) allows air to circulate on all sides.
For bread specifically, we recommend cooling completely — at least 1-2 hours — before slicing. It's agonizing, but it makes a real difference. If you're fighting texture issues, our complete guide to fixing gluten-free bread texture covers cooling and more.
Oven thermometer
Most home ovens are off by 25-50°F from what the dial says. Since gluten-free recipes are more sensitive to temperature swings (too hot and the outside sets before the inside bakes through; too cool and you get poor rise), an oven thermometer is a cheap fix that pays for itself immediately. Hang one from your oven rack and check it before every bake.
Mixing bowls in multiple sizes
You need at least three mixing bowls: a large one for dry ingredients, a medium one for wet ingredients, and a small one for pre-mixing binders like xanthan gum or chia seed gel. Stainless steel or glass bowls are preferable to plastic — they don't absorb odors, they're easier to clean thoroughly (important for cross-contamination), and glass lets you see what's happening with your mixture.
Whisk and hand mixer
Even if you own a stand mixer, a good balloon whisk is essential for combining dry ingredients without turning on a machine. For smaller batches of muffins or quick breads, a hand mixer is often more practical than a stand mixer and gives you better control over mixing speed — important since overmixing gluten-free batters can deflate them.
Complete essential gluten-free baking equipment checklist
Here's everything in one place, organized by priority:
Priority | Equipment | Approximate cost |
|---|---|---|
Must-have | Digital kitchen scale | $25-50 |
Must-have | Instant-read thermometer | $15-100 |
Must-have | Measuring cups and spoons | $10-20 |
Must-have | Fine-mesh sieve | $8-15 |
Must-have | Silicone spatulas (set of 3) | $10-15 |
Must-have | Parchment paper | $5-10 |
Must-have | Cooling rack | $10-15 |
Must-have | Oven thermometer | $5-10 |
Must-have | Mixing bowls (set of 3+) | $15-30 |
Highly recommended | Stand mixer with paddle | $250-400 |
Highly recommended | 8.5 x 4.5-inch loaf pan | $10-20 |
Highly recommended | 9-inch round cake pans (2) | $15-25 |
Highly recommended | Half sheet pans (2) | $15-25 |
Highly recommended | Silicone baking mat | $12-20 |
Highly recommended | Bench scraper | $5-10 |
Nice to have | 12-cup muffin tin | $10-15 |
Nice to have | Hand mixer | $25-40 |
You can outfit a solid gluten-free baking station for under $150 if you skip the stand mixer and prioritize the must-haves. Add the stand mixer when your budget allows — it's a game-changer for bread.
Tips for preventing cross-contamination with shared equipment
If your kitchen isn't 100% gluten-free, equipment management matters. Shared toasters, cutting boards, and wooden utensils are the biggest risks. Here's what to keep separate:
- Wooden spoons and rolling pins — wood is porous and can trap gluten particles even after washing.
- Colanders and strainers — pasta water residue is a common source of contamination.
- Toaster — get a dedicated gluten-free toaster or use toaster bags.
- Baking stones — pizza stones absorb oils and particles; use a dedicated one or line with parchment.
- Silicone molds with scratches or cuts — replace any that show visible wear.
Stainless steel and glass are the safest shared materials since they are completely cleanable. When in doubt, label your gluten-free equipment clearly.
Frequently asked questions
Do I need a stand mixer for gluten-free baking?
A stand mixer is highly recommended but not strictly required. Gluten-free bread doughs especially benefit from sustained mixing to properly hydrate starches and activate binders. A hand mixer can work for cookies, muffins, and cakes, but you'll struggle with thicker bread batters. If you bake bread regularly, a stand mixer is worth the investment.
What is the most important tool for gluten-free baking?
A digital kitchen scale is the single most important tool. Gluten-free flours vary significantly in weight per cup, and even small measurement errors can cause dense, dry, or gummy results. Weighing ingredients eliminates this variable entirely. See our guide to measuring baking ingredients for more on why this matters.
Can I use the same baking pans for gluten-free and regular baking?
Yes, metal and glass baking pans can be safely shared as long as they're washed thoroughly between uses. The risk is minimal compared to porous materials like wood or scratched silicone. However, if you're baking for someone with celiac disease, dedicated pans with parchment paper lining provide an extra layer of safety.
Why do my gluten-free baked goods stick to the pan?
Gluten-free batters tend to be stickier and higher in sugar content, which increases sticking. Always line pans with parchment paper, even if the recipe doesn't specify it. Greasing alone is often not enough for gluten-free recipes. A combination of grease plus parchment gives you the most reliable release.
What kind of baking pans are best for gluten-free bread?
Light-colored aluminized steel loaf pans in the 8.5 x 4.5-inch size produce the most consistent results for gluten-free bread. Avoid dark nonstick pans, which can over-brown the crust before the interior is fully baked — a common cause of dense gluten-free bread. Glass pans work but conduct heat differently, so you may need to adjust baking time.

Written by
Co-founder, BakingSubs
Co-founder of BakingSubs, where he turns the science of ingredient substitutions into tested, reliable guidance for home bakers.
Related Posts
How to Ship Baked Goods That Arrive Fresh: 9 Operator-Tested Methods That Cut Damage Claims by 80%
How Much Does Bakery Insurance Actually Cost? Real Numbers From 6 Policy Types
How to Manage Rush Orders as a Home Baker (Without Wrecking Your Week or Your Margins)
Bake with Confidence
See all
Confident Gluten-Free Baker Toolkit
The science-based system that replaces gluten's seven invisible jobs so your baking turns out soft, fluffy, and foolproof — every time.

Gluten-Free Recipe Vault
Instant access to our complete library of proven gluten-free recipes — no waiting, no guesswork, just results that work tonight.

Fix Your Gluten-Free Bread
Learn the 3-step formula to make bread rise and stay soft, discover why your loaves collapse, and get a tested sandwich bread recipe that actually works.