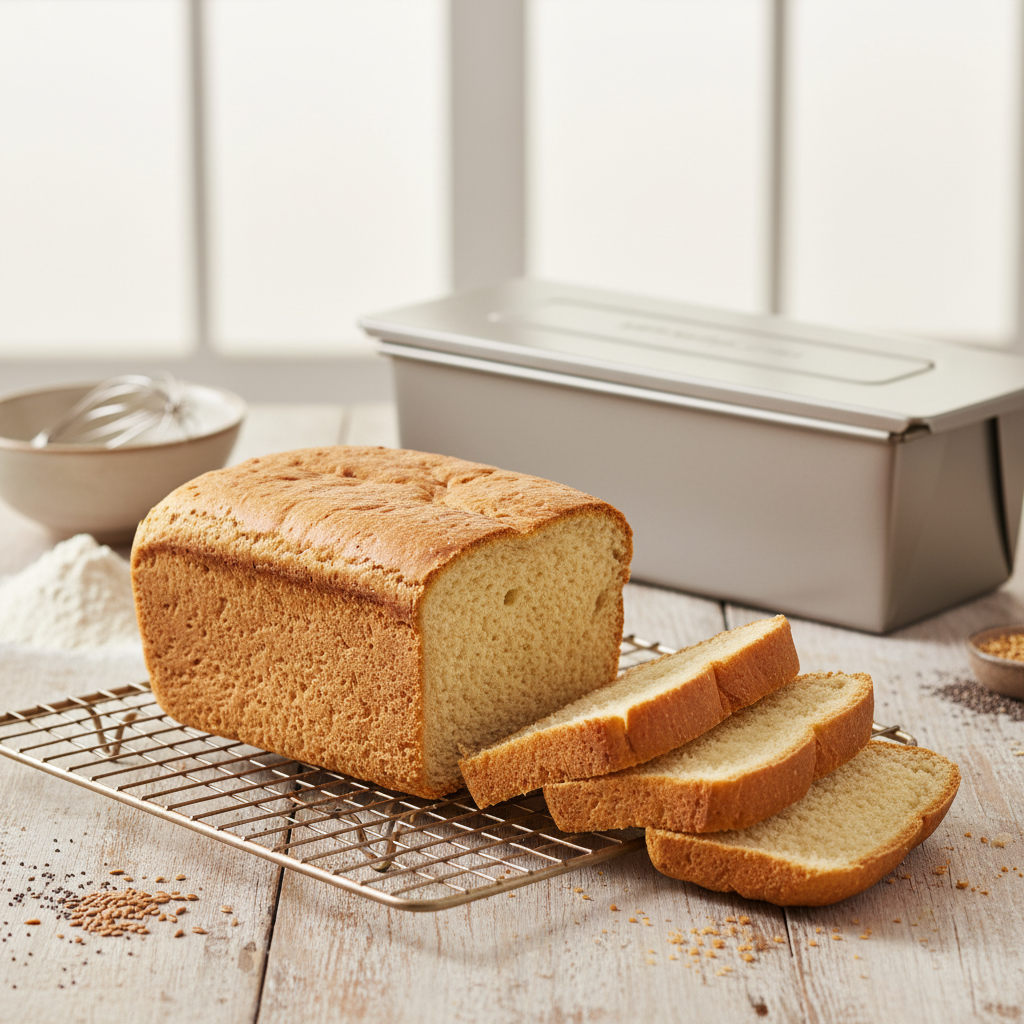
If you've been struggling to get tall, even slices from your gluten-free bread, the pan itself might be the problem. A Pullman loaf pan gives gluten-free dough the structural support it desperately needs, producing bread that looks and feels like what you'd find at a bakery.
Key takeaways
- A Pullman loaf pan's tall, straight sides and sliding lid support weak gluten-free dough, preventing collapse and spreading.
- The enclosed baking environment traps steam, which improves crust and crumb texture in gluten-free bread.
- Standard 13x4x4-inch Pullman pans produce perfectly square sandwich slices — no more wedge-shaped bread.
- USA Pan and King Arthur are the two most recommended Pullman pans for gluten-free bakers.
- You'll need to adjust bake time and filling level compared to regular loaf pans, but the results are dramatically better.
What is a Pullman loaf pan and why does it matter for gluten-free bread?
A Pullman loaf pan (also called a pain de mie pan) is a long, narrow baking pan with a sliding lid that creates a fully enclosed baking chamber. The lid constrains the dough as it rises, producing a perfectly rectangular loaf with a fine, uniform crumb and thin, soft crust.
For gluten-free bakers, this design solves several problems at once. Without gluten's elastic protein network, GF bread dough is essentially a thick batter that relies on the pan walls for structure. A standard loaf pan's sloped sides let the dough spread outward, and the open top means there's nothing stopping it from rising unevenly or collapsing once it overextends. The Pullman pan's tall, straight walls and lid act like a mold, guiding the rise and keeping the loaf's shape consistent from crust to crust.
The enclosed environment also traps moisture during baking. This steam helps gelatinize starches on the surface more evenly, which means a thinner, softer crust — something gluten-free bread often struggles with. If you've ever pulled a GF loaf out of the oven only to find a thick, tough exterior and a gummy interior, a Pullman pan can help address both issues.
How a Pullman pan compares to a standard loaf pan for gluten-free baking
The differences between a Pullman pan and a standard loaf pan might seem subtle, but they have a real impact on gluten-free bread outcomes. Here's a side-by-side comparison:
| Feature | Standard loaf pan (9x5) | Pullman loaf pan (13x4x4) |
|---|---|---|
| Sides | Sloped, shorter | Straight, tall |
| Lid | None (open top) | Sliding lid included |
| Loaf shape | Domed or mushroom top | Perfectly rectangular |
| Crumb structure | Uneven, larger holes near top | Fine, uniform throughout |
| Crust | Thicker, sometimes tough | Thin, soft on all sides |
| Dough support | Moderate | Excellent — walls + lid |
| Slice uniformity | Variable (wider top, narrow bottom) | Square, sandwich-ready |
For a deeper look at how pan choice affects your results, check out our full roundup of the best gluten-free loaf pans.
If you're serious about improving your gluten-free bread game, our Confident Gluten-Free Baker Toolkit walks you through equipment choices, technique adjustments, and troubleshooting — it's a great companion to a good pan.
Best Pullman loaf pans for gluten-free bread
Two Pullman pans consistently come up as the top choices among gluten-free bakers, and we've tested both extensively.
USA Pan 13x4x4-inch Pullman loaf pan
The USA Pan Pullman Loaf Pan is the one we reach for most often. It's made from heavy-gauge aluminized steel with a silicone-based Americoat nonstick coating that's PTFE- and BPA-free. The corrugated surface design helps with airflow and even browning, and the sliding lid fits snugly without being difficult to remove.
For gluten-free bread specifically, the weight of this pan is a real advantage. Lighter pans can lead to hot spots and uneven baking — a problem that shows up as texture inconsistencies in GF loaves. The USA Pan distributes heat evenly, which helps starches set properly throughout the loaf.
King Arthur Pullman loaf pan
The King Arthur Pullman Loaf Pan is another excellent option. It's slightly more expensive but comes from a brand that many gluten-free bakers already trust (we've reviewed their gluten-free bread flour and it's solid). The construction is similar — heavy-gauge steel with a reliable nonstick coating and a well-fitting lid.
Both pans produce essentially the same results. If you already buy from King Arthur, their pan is a natural fit. If you want to save a few dollars, the USA Pan is the better value.
How to use a Pullman pan for gluten-free bread
Using a Pullman pan for gluten-free bread isn't quite the same as using it for wheat bread. Here are the key adjustments you'll need to make.
How much to fill the pan
Fill your Pullman pan about 60-65% full with gluten-free bread batter. This is lower than the 70-75% you'd use for wheat dough because GF batters can rise unpredictably — too much batter and you'll end up with dough pushing against the lid and creating a dense, compressed loaf. Too little and you'll have a short, squat bread with too much air space at the top.
We always weigh our batter rather than eyeballing it. A good kitchen scale makes this repeatable every time. For a 13x4x4 pan, aim for roughly 900-1000 grams of batter, though this varies by recipe.
When to put the lid on
This is where things differ from wheat bread. With wheat Pullman bread, you typically slide the lid on before baking. For gluten-free bread, we recommend letting the dough proof with the lid off until it rises to about three-quarters of the pan height, then gently sliding the lid on before putting it in the oven. This gives you a visual check on the rise and prevents you from trapping under-proofed or over-proofed dough.
Temperature and timing adjustments
Bake at a slightly lower temperature than you would in an open pan — typically 350-375 degrees F rather than 375-400 degrees F. The enclosed environment retains more heat, so you need to compensate to avoid over-browning the crust before the center is done.
Bake time will be longer, usually 45-60 minutes depending on your recipe. The best way to know when your bread is done is to check the internal temperature with an instant-read thermometer. You're looking for 205-210 degrees F in the center of the loaf.
Removing the bread
Slide the lid off as soon as the pan comes out of the oven — trapped steam can make the crust soggy if left too long. Let the loaf cool in the pan for about 10 minutes, then turn it out onto a wire rack. Gluten-free bread is especially fragile when hot, so resist the urge to slice it right away. We recommend waiting at least an hour for the crumb to fully set.
Why the Pullman pan fixes common gluten-free bread problems
Many of the most frustrating gluten-free bread issues trace back to inadequate structural support during baking. Here's how a Pullman pan addresses them:
Collapsing loaves: The lid prevents over-rising, which is the number one cause of gluten-free bread collapse. Without gluten to hold gas bubbles, GF dough that rises too high simply can't support itself. The lid acts as a ceiling, controlling the final height.
Dense, heavy texture: Because the pan distributes heat evenly on all four sides plus the top, the crumb bakes more uniformly. You're less likely to end up with a dense center surrounded by an over-baked exterior.
Crumbly slices: The fine, tight crumb structure that a Pullman pan produces naturally holds together better when sliced. Combined with the right binder (we're big fans of psyllium husk for sandwich bread), you'll get slices that can actually hold a sandwich together.
Uneven slices: No more bread that's wide at the top and narrow at the bottom. Every slice from a Pullman loaf is the same shape, which makes it perfect for sandwiches, toast, and even French toast.
Tips for getting the best results
After baking dozens of gluten-free loaves in Pullman pans, here are the tips that make the biggest difference:
- Grease thoroughly, including the lid. Even with nonstick coating, gluten-free batters are stickier than wheat dough. A light spray of oil on all interior surfaces and the underside of the lid prevents sticking.
- Use a binder that promotes structure. Psyllium husk powder is our top pick for Pullman bread — it creates a gel network that mimics some of gluten's structural role. Check out our guide on poor rise in gluten-free baking for more on getting the right lift.
- Don't skip the preheat. A fully preheated oven ensures the dough starts setting from the bottom up immediately, which helps prevent sinking.
- Weigh your ingredients. Gluten-free bread is far less forgiving than wheat bread when it comes to ingredient ratios. Even small measurement errors can throw off the balance. A scale is non-negotiable.
- Let the bread cool completely before slicing. This is true for all GF bread, but especially Pullman loaves. The crumb needs time to set, and cutting too early will give you a gummy, compressed slice.
Frequently asked questions
Can you use a Pullman loaf pan without the lid for gluten-free bread?
Yes, you can use a Pullman pan without the lid and still benefit from the tall, straight sides that support gluten-free dough. You'll get a slightly domed top rather than a flat, square loaf, and the crust will be a bit thicker since there's no trapped steam. It's still a significant upgrade over a standard loaf pan for GF baking.
What size Pullman pan is best for gluten-free bread?
The standard 13x4x4-inch Pullman pan works best for most gluten-free bread recipes. It produces slices that are a good sandwich size without requiring an enormous batch of dough. Some companies make smaller 9-inch versions, but the longer pan gives the dough more room to rise evenly and bakes more consistently.
Do you need to adjust gluten-free bread recipes for a Pullman pan?
You'll need to make a few tweaks. Fill the pan only 60-65% full, reduce your oven temperature by about 25 degrees F, and expect a longer bake time (45-60 minutes). Use an instant-read thermometer to check for doneness at 205-210 degrees F. The recipe ingredients themselves don't need to change.
Why does my gluten-free bread stick to the Pullman pan lid?
Sticking usually happens when the dough rises too high and presses firmly against the lid, or when the lid isn't greased. Always spray the underside of the lid with oil before baking, and make sure you're not overfilling the pan. If sticking is a persistent issue, lining the bottom of the pan with parchment paper can also help with release. For more on sticky dough issues, see our guide on making gluten-free bread less sticky.
Is a Pullman pan worth it if I only bake gluten-free bread occasionally?
If you bake even one loaf a month, a Pullman pan is worth the investment. The improvement in loaf shape, crumb texture, and slice uniformity is dramatic compared to a standard pan. Both the USA Pan and King Arthur versions are built to last for years, so the per-loaf cost drops quickly. Plus, you can use it for wheat-based pain de mie if you bake for others.

Written by
Co-founder, BakingSubs
Co-founder of BakingSubs, where he turns the science of ingredient substitutions into tested, reliable guidance for home bakers.
Related Posts
How to Ship Baked Goods That Arrive Fresh: 9 Operator-Tested Methods That Cut Damage Claims by 80%
How to Price Sourdough Bread for Sale: A Real Framework From Bakers Who Actually Profit
How to Take Photos of Baked Goods With Your Phone (Without Spending a Dime on Gear You Don't Need)
Bake with Confidence
See all
Confident Gluten-Free Baker Toolkit
The science-based system that replaces gluten's seven invisible jobs so your baking turns out soft, fluffy, and foolproof — every time.

Gluten-Free Recipe Vault
Instant access to our complete library of proven gluten-free recipes — no waiting, no guesswork, just results that work tonight.

Fix Your Gluten-Free Bread
Learn the 3-step formula to make bread rise and stay soft, discover why your loaves collapse, and get a tested sandwich bread recipe that actually works.