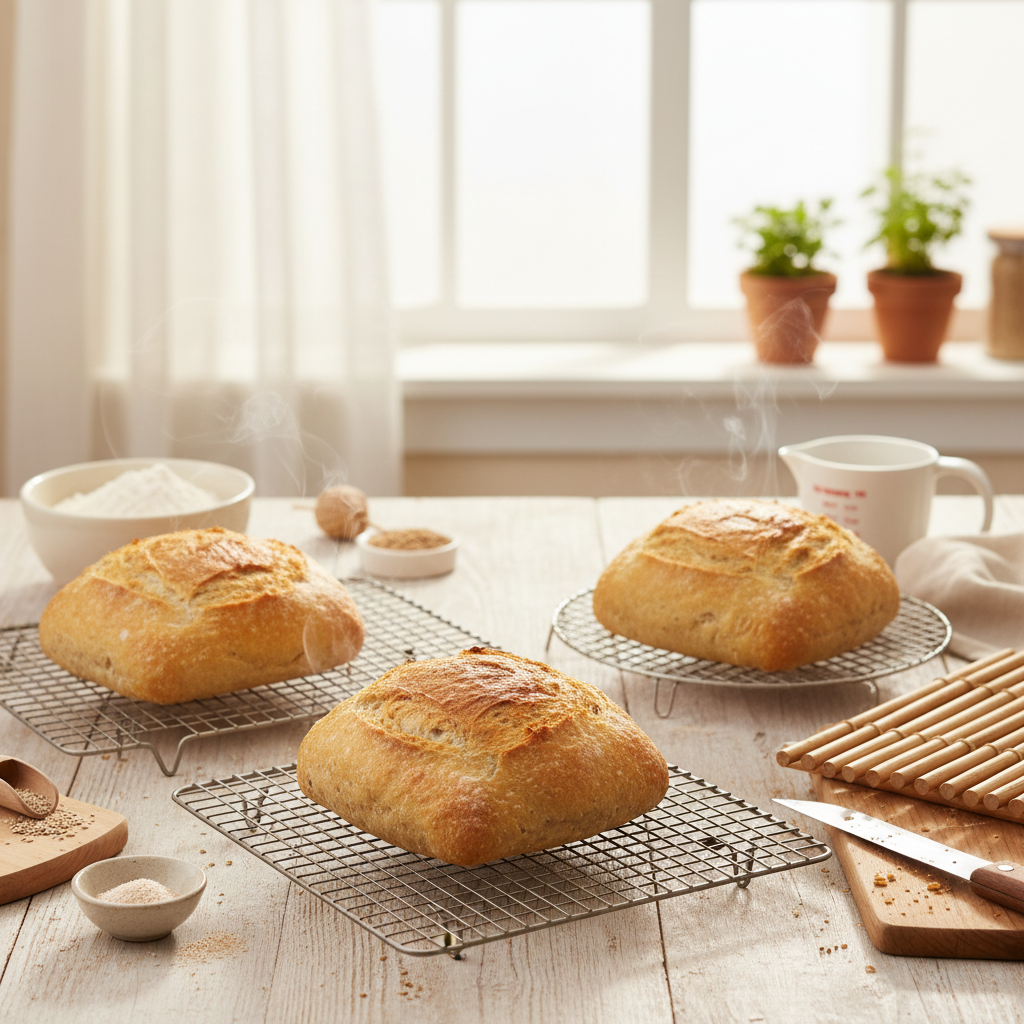
If your gluten-free bread keeps turning out gummy in the middle, the problem might not be your recipe — it might be how you're cooling it. A proper cooling rack is one of the most overlooked tools in gluten-free bread baking, and choosing the right one makes a real difference in texture.
Key takeaways
- Gluten-free bread traps more moisture than wheat bread, making proper airflow during cooling essential to prevent gummy centers.
- A wire cooling rack with a tight grid pattern (no wider than 1/2 inch between wires) prevents loaves from sagging or falling through.
- Elevated racks with at least 1 inch of clearance allow steam to escape from the bottom of the loaf, which is where moisture collects most.
- Cooling gluten-free bread on a flat surface like a cutting board or countertop creates condensation that softens the crust and makes the interior soggy.
- The best cooling racks for bread baking are stainless steel, oven-safe, and large enough to hold a full loaf without hanging over the edges.
Why cooling matters more for gluten-free bread
Gluten-free bread retains significantly more internal moisture than conventional wheat bread because the starches and binders used in GF recipes hold water differently. When you pull a loaf from the oven, the interior temperature is around 200-210°F, and all that moisture is still in the form of steam. If that steam can't escape evenly, it condenses back into the crumb and creates the dreaded gummy middle that so many GF bakers struggle with.
A cooling rack lifts the bread off the surface so air circulates underneath. Without it, the bottom of the loaf sits in its own trapped moisture, and that wetness wicks upward through the crumb. We've tested this side by side — same recipe, same oven, same bake time — and the loaf cooled on a flat cutting board was noticeably gummier than the one on a raised wire rack. It's one of the simplest fixes in our gluten-free bread troubleshooting guide.
This is also why we recommend checking your bread's internal temperature with an instant-read thermometer before you even start the cooling process. If it's not at least 205°F inside, more cooling rack time won't fix an underbaked loaf.
What to look for in a cooling rack for bread
Not all cooling racks are created equal, especially for bread baking. Here's what actually matters when you're shopping:
Grid pattern and wire spacing
A tight grid pattern is essential. Racks with widely spaced parallel wires let soft GF bread sag between the gaps, which creates uneven cooling and dents in the bottom of your loaf. Look for a crosshatch or grid pattern with no more than 1/2 inch between wires.
Height and clearance
The rack needs at least 1 inch of clearance from whatever surface it's sitting on. More height means better airflow underneath. Some racks have short little feet that barely lift the surface — skip those for bread baking.
Size
A standard half-sheet-pan-sized rack (roughly 17 x 12 inches) is ideal. It gives you room for a full loaf with space around the edges for air to move. If you bake in a loaf pan, you'll want room to unmold and cool without the bread hanging over the edge.
Material
Stainless steel is the gold standard. It won't rust, it's dishwasher safe, and it won't warp if you also use it in the oven. Chrome-plated racks are cheaper but tend to rust over time, especially in humid kitchens.
If you're building out your GF baking setup, our Confident Gluten-Free Baker Toolkit covers all the essential equipment recommendations in one place — cooling racks included.
5 best cooling racks for bread baking
We've tested a lot of cooling racks over the years. Here are the five that we think work best for gluten-free bread baking specifically, based on airflow, durability, and how well they handle heavier loaves.
| Cooling rack | Size | Grid pattern | Height | Best for |
|---|---|---|---|---|
| Checkered Chef Stainless Steel Cooling Rack | 17 x 12 in | Tight crosshatch | 1 inch | Best overall for bread |
| OXO Good Grips Non-Stick Pro Cooling Rack | 17 x 12.5 in | Grid | 1.25 inches | Best for heavy loaves |
| CIA Bakeware Half Sheet Cooling Rack | 17 x 11.5 in | Tight grid | 1 inch | Best durability |
| Nordic Ware Oven Safe Nonstick Cooling Rack | 16.5 x 11.5 in | Crosshatch | 0.75 inches | Best budget option |
| Wilton Perfect Results Cooling Grid | 16 x 10 in | Grid | 0.75 inches | Best for smaller loaves |
Checkered Chef stainless steel cooling rack
This is our top pick for gluten-free bread baking. The Checkered Chef Stainless Steel Cooling Rack has a tight crosshatch grid that supports soft GF loaves without any sagging. It fits perfectly inside a standard half-sheet pan, which is great if you want to catch crumbs or use it for oven baking too. The stainless steel construction means no rusting and no warping. We've had ours for three years and it still looks new.
OXO Good Grips non-stick pro cooling rack
If you bake dense, heavy GF loaves (and let's be honest, many of us do), the OXO Good Grips Non-Stick Pro Cooling Rack is incredibly sturdy. The feet are slightly taller than most racks, giving you excellent airflow underneath. The non-stick coating makes cleanup easy, though we'd recommend hand washing to preserve it long-term.
CIA Bakeware half sheet cooling rack
This is a professional-grade rack that's built to last. The CIA Bakeware Half Sheet Cooling Rack is heavy-gauge stainless steel with a tight grid. It's oven safe up to 500°F, so you can use it for other baking tasks too. It's pricier than the others, but if you want a buy-it-once option, this is it.
Nordic Ware oven safe nonstick cooling rack
The Nordic Ware Oven Safe Nonstick Cooling Rack is a solid budget option. The crosshatch pattern supports bread well, and the nonstick coating makes cleanup a breeze. The feet are a little shorter than we'd like (about 3/4 inch), but it still provides adequate airflow for most loaves. If you're just getting started with GF baking, this is a great entry point.
Wilton Perfect Results cooling grid
The Wilton Perfect Results Cooling Grid is slightly smaller than the others, which makes it a good choice if you have limited counter space or bake smaller loaves. The grid pattern is tight enough for GF bread, and it's surprisingly sturdy for its price point.
How to cool gluten-free bread properly
Having the right rack is only half the equation. Here's the cooling process we follow for every loaf:
- Check internal temperature first. Use an instant-read thermometer to confirm the center of the loaf reads at least 205°F. If it's not there yet, put it back in the oven.
- Remove from the pan within 5-10 minutes. Let the loaf sit in the pan just long enough to firm up slightly, then turn it out onto your cooling rack. Leaving it in the pan too long traps steam.
- Cool on the rack for at least 1-2 hours. We know it's tempting to slice in immediately, but GF bread needs this time. The starches are still setting as the bread cools, and cutting too early releases all that trapped moisture, leaving you with a gummy, sticky interior.
- Don't cover the bread while cooling. Tenting with foil or a towel traps steam and undoes all the work your cooling rack is doing.
- Cool completely before storing. Wrapping warm bread creates condensation inside the bag, which makes the crust soggy and promotes mold growth.
If you've been following all of this and your bread is still gummy, the issue may be elsewhere in your process. Check out our guide on fixing gummy centers in gluten-free baking for a deeper dive into other causes.
Common cooling mistakes that ruin gluten-free bread
We see these mistakes all the time, and they're all easy to fix:
- Cooling on a cutting board or plate. Flat surfaces trap moisture underneath the loaf. Always use a wire rack.
- Slicing too early. The internal structure of GF bread is still setting for up to two hours after it comes out of the oven. Cutting in early collapses the crumb and releases steam that should be escaping gradually. This is one of the top issues in our guide to making GF bread less sticky.
- Using a rack with wide-spaced wires. Soft GF bread sags between widely spaced wires, creating pressure points that trap moisture.
- Cooling in a drafty spot. While airflow is good, a strong draft can cool the outside too quickly while the inside stays wet. A consistent room-temperature spot is ideal.
- Stacking loaves on one rack. If you're baking multiple loaves, give each one its own rack or enough space that air can circulate freely around each one.
Do you really need a dedicated cooling rack?
Honestly? Yes — especially for gluten-free bread. We've seen people try to improvise with oven grates, upside-down muffin tins, and even chopsticks laid across a baking sheet. Some of these work in a pinch, but none of them provide the consistent, even airflow that a proper cooling rack does.
A good cooling rack costs between $10 and $25 and will last you years. When you consider how much you spend on specialty flours and ingredients for each loaf, it's a tiny investment that prevents a lot of wasted bakes. We include it in our essential gluten-free baking equipment list for exactly this reason.
Frequently asked questions
Can I cool gluten-free bread on a baking sheet instead of a cooling rack?
No, cooling gluten-free bread directly on a baking sheet traps moisture underneath the loaf, which leads to a soggy bottom and gummy interior. A wire cooling rack elevates the bread so steam can escape from all sides. This is especially important for GF bread because it retains more moisture than wheat bread.
How long should gluten-free bread cool before slicing?
Gluten-free bread should cool on a wire rack for at least 1 to 2 hours before slicing. The starches and binders in GF bread continue to set as the loaf cools, and cutting too early releases trapped steam that makes the crumb gummy and sticky. For the best texture, resist the urge to slice until the loaf is completely cool to the touch.
What is the best cooling rack material for bread baking?
Stainless steel is the best material for a bread cooling rack. It's rust-resistant, durable, dishwasher safe, and won't warp at high temperatures if you also use it in the oven. Chrome-plated racks are cheaper but tend to chip and rust over time, especially with frequent washing.
Why is my gluten-free bread gummy even after cooling?
If your bread is still gummy after proper cooling, the issue is likely underbaking or too much moisture in your recipe. Use an instant-read thermometer to confirm the internal temperature reaches at least 205°F before removing from the oven. You can also check our full guide on why gluten-free bread is gummy in the middle for other common causes.
Does the size of the cooling rack matter for bread?
Yes, the cooling rack should be large enough that the entire loaf sits on the surface with at least an inch of space around the edges. This allows air to circulate freely around the bread. A half-sheet-pan-sized rack (approximately 17 x 12 inches) works well for standard loaves and gives you room for proper airflow.

Written by
Co-founder, BakingSubs
Co-founder of BakingSubs, where he turns the science of ingredient substitutions into tested, reliable guidance for home bakers.
Related Posts
Best gluten-free baking courses and classes online ranked for every skill level
Best gluten-free bread brands ranked: 15 loaves we actually tested and compared
How to Ship Baked Goods That Arrive Fresh: 9 Operator-Tested Methods That Cut Damage Claims by 80%
Bake with Confidence
See all
Confident Gluten-Free Baker Toolkit
The science-based system that replaces gluten's seven invisible jobs so your baking turns out soft, fluffy, and foolproof — every time.

Gluten-Free Recipe Vault
Instant access to our complete library of proven gluten-free recipes — no waiting, no guesswork, just results that work tonight.

Fix Your Gluten-Free Bread
Learn the 3-step formula to make bread rise and stay soft, discover why your loaves collapse, and get a tested sandwich bread recipe that actually works.